Creating an eye-catching display for your business can significantly impact sales. One effective solution is a cardboard display rack. Knowing how to assemble a cardboard display rack is crucial for your marketing strategy. It provides a flexible, cost-effective option that appeals to various customers.
This project is simple yet highly beneficial. You can easily customize the design to fit your brand. A well-built rack can showcase your products effectively. However, it's essential to consider the materials and assembly methods carefully. A sturdy rack increases reliability and customer trust, while a poorly assembled one may lead to brand damage.
As you embark on this journey, remember that mistakes may happen. The assembly process requires patience and a little creativity. Reflecting on your approach can lead to improvements in future projects. Developing this skill not only benefits your current business but also enhances your expertise in retail presentation.
Choosing the right cardboard material is crucial for creating an effective display rack. Not all cardboard is the same; different types have varying strengths and applications. According to industry reports, corrugated cardboard is often preferred for its durability and resistance to deformation. This material can handle heavy items without losing shape, making it ideal for product displays.
When selecting cardboard, consider the thickness and flute size. A thicker material, such as double-walled cardboard, can support heavier products. This type is well-suited for retail environments where sturdiness is essential. On the other hand, single-walled cardboard is lighter and more suitable for promotional displays with lighter items.
Tips: Ensure the cardboard is recycled for a more eco-friendly approach. Additionally, test samples before final production. This allows you to evaluate strength and flexibility. Remember that a poorly chosen material can impact the overall appearance and effectiveness of your display rack. Always assess your product weight and environment for optimal results.
| Material Type | Strength (lbs) | Weight (lbs/ft²) | Cost ($/ft²) | Eco-Friendliness |
|---|---|---|---|---|
| Single Wall | 30 | 0.25 | 0.20 | Yes |
| Double Wall | 60 | 0.32 | 0.30 | Yes |
| Triple Wall | 90 | 0.40 | 0.50 | Yes |
| Reinforced Cardboard | 80 | 0.35 | 0.40 | Yes |
| Standard Cardboard | 25 | 0.20 | 0.15 | Yes |
When assembling a cardboard display rack, having the right tools and supplies is crucial. Essential items include a utility knife for precise cutting. This tool helps create clean edges on your cardboard pieces. Use a cutting mat underneath to protect surfaces and ensure safety.
You will also need strong adhesive tape. It helps secure corners and joints effectively. Consider double-sided tape for a cleaner finish. Additionally, gather a ruler and a pencil to mark measurements accurately. These supplies may seem simple, but they make a significant difference in the assembly process.
Remember, mistakes can happen. Misalignment of pieces may require adjustments. Sometimes, the tape might not hold as expected. Reflect on these moments; they can teach you about patience and craftsmanship. Each assembly is a chance to improve your skills and learn from past experiences.
Creating a cardboard display rack might seem daunting, but with the right approach, it can be an enjoyable project. Begin by gathering your materials, including sturdy cardboard sheets, a ruler, a craft knife, and some tape. Measure your desired dimensions carefully. Cutting pieces to the right size is crucial, but mistakes can happen. It's okay to cut a piece too short. Just make adjustments or recut another piece to fit.
Next, shape the cardboard. Bend and fold it according to your design. Use your ruler to create clean lines. It’s important to score the cardboard lightly where needed for easier bends. If the folds aren't precise, the structure could wobble. Don’t hesitate to test the fit of each piece as you go. This method may require patience and a few retries.
Finally, assemble the parts together. Use tape or glue to secure them firmly. Reinforce joints, especially if the display holds heavier items. Sometimes your initial design will need tweaks. This adaptability can lead to better results. Each mistake can teach valuable lessons. Building a display rack out of cardboard doesn’t have to be perfect, but it should be functional and tailored to your needs.
Assembling a cardboard display rack can be straightforward. Stability is key to ensuring your products are showcased effectively. Start by collecting your materials. You’ll need sturdy cardboard sheets, a sharp cutter, and a hot glue gun.
Create a base that can support the weight of your products. The base should be larger than the top shelves. Reinforce the corners with extra cardboard to prevent bending. This technique adds stability and durability. Ensure the base is level to avoid wobbling. If it tilts, it may fall over.
Tips: Use a square to check right angles. This will improve the overall structure. You can also add weights at the bottom of the display. Taping down the edges can prevent the rack from collapsing. Don’t underestimate the importance of testing the rack. An unstable display can harm your business image.
Consider the height of the shelves. They should be accessible without straining. If shelves are too high, customers may not reach the products. This can limit sales. It’s wise to ask for feedback from others. Their insights may reveal design flaws. Remember, a well-assembled display rack is essential for your brand presence.
Customizing your cardboard display rack can significantly enhance your branding and functionality. Start by selecting colors that align with your brand's palette. Bold hues attract attention, while softer shades offer a more sophisticated look. You can use high-quality prints for logos or taglines.
A well-placed logo instantly makes your rack recognizable.
Think about the structure, too. Consider adding shelves or compartments suited for your products. Design your rack to fit various items while keeping aesthetics in mind. Maybe a clipboard feature for informational flyers? This allows you to promote sales or events easily.
Don’t forget to reflect on your initial design choices. Ask yourself, does it truly represent your brand? Test different arrangements and observe customer interactions. Sometimes, feedback leads to improvements you initially overlooked.
Adjusting small details can make a big impact on customer experience.
: You need a utility knife, strong adhesive tape, a ruler, and a pencil.
A cutting mat protects surfaces and ensures safety while cutting cardboard.
Reflect on mistakes, like misaligned pieces or tape not holding. Each assembly is a learning opportunity.
Select colors that fit your brand. Bold hues attract attention; softer shades are more sophisticated.
Add shelves or compartments for products. Consider features like clipboards for flyers or information.
Design choices reflect your brand identity. Ensure they align with your overall message for recognition.
Customer feedback helps identify improvements. Adjustments based on feedback can enhance the overall experience.
Test different arrangements and reflect on your choices. Changes may lead to better customer interaction.
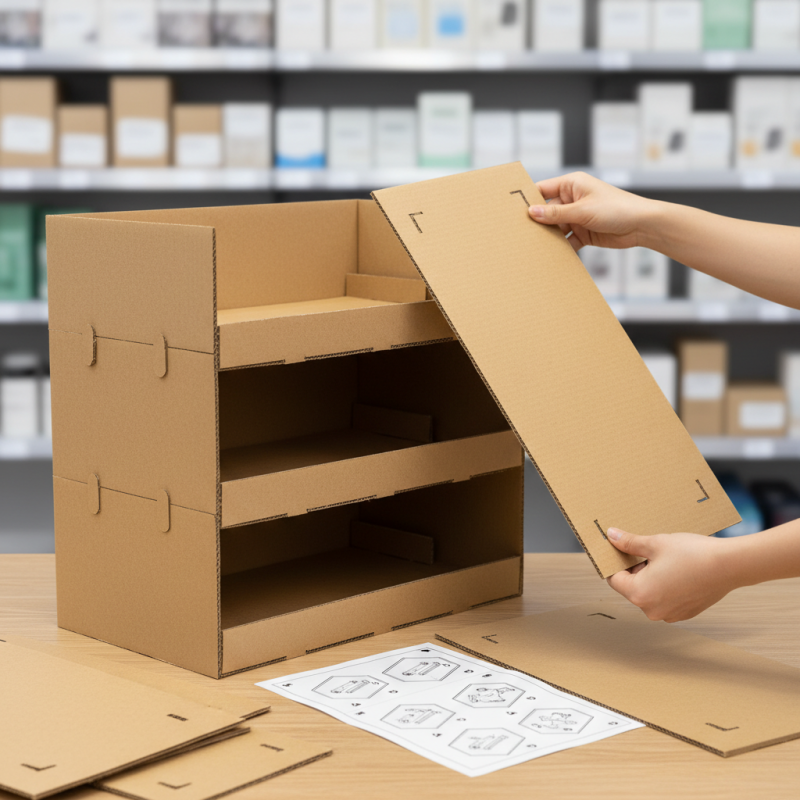
Assembling a cardboard display rack can be a straightforward process when you follow a methodical approach. To begin, it is crucial to choose the right type of cardboard material that balances durability and aesthetics for your business needs. Essential tools and supplies, such as scissors, a ruler, and adhesive, will aid in the assembly process. Once you have gathered your materials, a step-by-step guide can help you cut and shape the cardboard pieces effectively.
Furthermore, you’ll want to implement techniques that ensure the rack's stability during assembly to provide a reliable display for your products. Finally, feel free to customize your cardboard display rack to align with your branding and improve its functionality. By following these steps, you will have a complete understanding of how to assemble a cardboard display rack that is both practical and visually appealing for your business.
D-Strom Rack