5 Best Ways to Waterproof a Paper Rack Base?

Time:2026-09-23 Author:Isabella
0%

A paper rack can look sturdy while its base quietly absorbs moisture from concrete, wet floors, or cleaning water. Swollen edges, soft corners, and dark stains usually appear after the damage has started. Learning How to waterproof the base of a paper rack therefore requires more than brushing on a random sealant. The material, floor contact, drainage, and maintenance routine all matter.

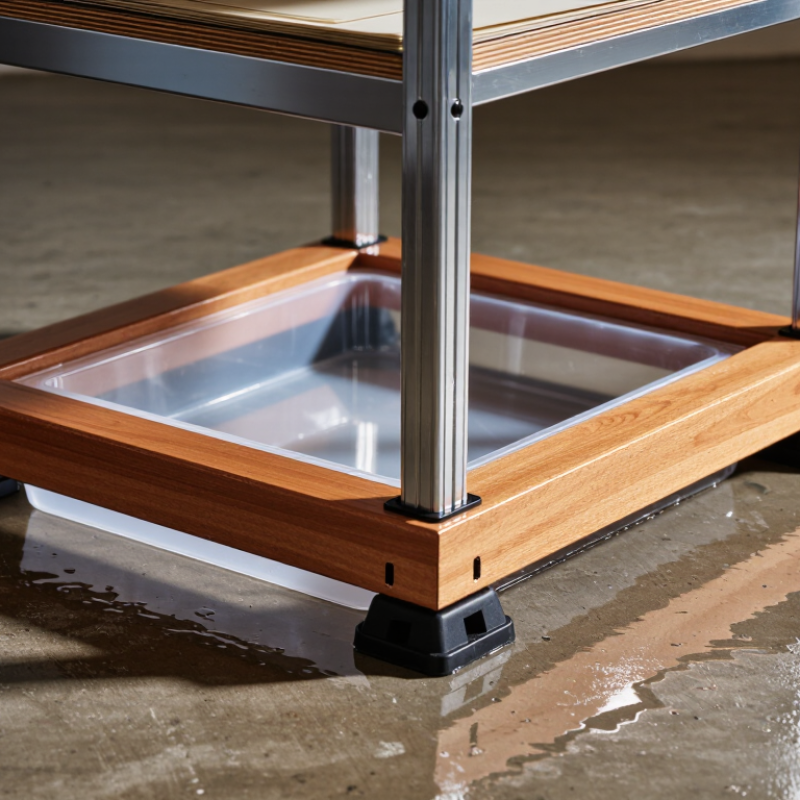
Packaging materials specialist Dr. Susan Selke offers a useful principle: “Moisture protection works best as a system, not as a single coating.” That idea guides this practical introduction to the five best methods. We will examine raised feet, waterproof liners, protective coatings, sealed joints, and simple drainage gaps. Each method solves a different weakness. A rubber foot can lift the rack from a damp floor. A fitted plastic tray can catch spills beneath paper stacks. A compatible polyurethane or epoxy coating can protect exposed wood, but only after careful surface preparation. Small gaps around screws and corners still need attention.

Details matter.

Before applying anything, dry the base completely and remove loose fibers, dust, and old adhesive. Test the product on a hidden area first. Some coatings remain tacky, crack under movement, or discolor paper packaging. That part is easy to overlook. No waterproofing method lasts forever, especially where mops, forklifts, or heavy loads cause repeated impact. Regular inspections remain necessary, even when the rack appears protected. The best solution is practical, repairable, and matched to the rack’s daily environment.
5 Best Ways to Waterproof a Paper Rack Base?

Choose a Water-Resistant Material for the Paper Rack Base

A paper rack base needs more than a quick coat of paint. Choose a water-resistant material before adding any sealant. High-density polyethylene and polypropylene sheets resist splashes, cleaning water, and daily scuffing. They also avoid swelling when moisture reaches the edges. These plastics work well for racks placed near entrances, windows, or damp storage areas.

For a heavier rack, sealed plywood can be practical. Use exterior-grade plywood, then protect every cut edge and screw hole. A small exposed edge can absorb water like a straw. I once overlooked the underside of a base, and trapped moisture later caused uneven swelling. That mistake changed my installation routine. I now inspect all six surfaces before assembly.

Material thickness matters too. A thin sheet may bend under stacked paper, allowing water to collect in the center. A rigid base should keep a slight slope toward a drainage edge. Rubber feet can lift it several millimeters above the floor. This airflow helps the underside dry faster. Avoid materials that only resist surface moisture. Paper dust and repeated wiping eventually challenge weak coatings. Test a sample with a damp cloth, standing water, and a loaded rack. Check it again after 24 hours. The best choice may look less attractive, but it should remain flat, stable, and easy to clean.

Clean and Prepare the Base Before Applying Waterproofing

A paper rack base needs careful preparation before any waterproofing method is applied. Paper fibers absorb moisture quickly, so avoid soaking the surface during cleaning. Remove loose dust with a soft brush or a low-suction vacuum. Pay attention to corners, seams, and the underside, where grit often collects.

Use a barely damp cloth with mild soap for stubborn marks. Wipe gently, then press the area with a dry towel. Do not scrub aggressively. I once rushed this step, and the softened paper lifted along one edge. Let the base dry completely in a warm, ventilated room. Direct heat can warp it. Patience matters here.

Inspect the base under bright light. Look for swelling, peeling layers, crushed corners, or dark moisture stains. Small raised fibers can be trimmed carefully with a sharp craft knife. Larger damage may need a thin paper patch and compatible adhesive. Sand only hardened rough spots, using very fine abrasive paper. Heavy sanding can weaken the base.

Test the chosen waterproofing material on a hidden section first. Check for discoloration, curling, stickiness, or loss of strength after drying. Some coatings remain flexible, while others crack when the rack bends. Clean tools and dry hands also matter. A flawless coating cannot fix a dirty or unstable foundation. I still sometimes underestimate drying time, especially in humid weather.

Seal the Surface with Waterproof Coating or Protective Film

Moisture usually enters through the base, not the visible sides. A paper rack needs a sealed, slightly raised foundation. In my workshop, I remove dust, loose fibers, and old adhesive before waterproofing. A clean surface helps the coating bond evenly. Let the base dry completely. Even slight dampness can trap moisture beneath the seal.

A water-resistant coating works well on cardboard, wood, or compressed paper surfaces. Apply two thin layers instead of one heavy layer. Use a small brush around corners and bottom edges. Allow each layer to cure according to its instructions. Do not place the rack on wet flooring during this stage. I once rushed this step, and the coating peeled near a corner. That mistake was preventable.

Protective film offers another practical option. Choose film with strong adhesive, then wrap it slightly over the edges. Press from the center outward to remove air pockets. Seal exposed seams with compatible waterproof tape. Adding rubber feet keeps the base above small spills. A shallow tray can provide extra protection in humid rooms. Inspect the underside every few weeks for lifting, cracks, or soft spots. Film can hide damage, so checking remains important. These methods improve resistance, but no paper-based rack stays waterproof forever.

Reinforce Edges and Joints to Prevent Water Infiltration

5 Best Ways to Waterproof a Paper Rack Base

A paper rack base usually fails at its edges and joints, not across its flat surfaces. These areas absorb splashes quickly and swell before damage becomes visible. Start by brushing away dust and loose paper fibers. Apply a thin waterproof coating along every exposed edge. Work it into seams with a small, stiff brush. Let each layer dry fully before adding another. Thick coats often crack when the base flexes.

Reinforce inside corners with narrow waterproof tape or flexible sealing strips. Press them firmly into the joint, especially where the side panels meet the bottom. A small amount of moisture-resistant adhesive can strengthen weak connections. Avoid flooding the seam with glue. It may soften the paper core. Adding protective corner pieces creates a second barrier against water. This detail takes minutes but prevents many failures. I once ignored a rear joint, and one small spill weakened the entire base.

Keep the rack slightly raised with stable, water-resistant feet. This prevents standing water from touching the underside. Seal the bottom perimeter carefully, including screw holes or cutouts. Inspect the base after heavy cleaning or humid weather. Look for lifted tape, hairline cracks, or soft spots. Recoat damaged areas early. My first repair was too generous with sealant, which made the edge uneven. A neater, thinner application worked better after sanding the surface lightly. Test the finished base with a few drops of water, then wipe it dry and check the joints again.

Dry, Inspect, and Maintain the Waterproofed Paper Rack Base

A paper rack base survives moisture only when waterproofing is followed by disciplined drying. Use a water-resistant coating, sealed edge tape, a removable plastic liner, raised feet, and a fitted cover. Never seal damp paper fibers. Trapped moisture can soften the base and encourage mold growth. Dry the rack at room temperature, with airflow across its underside. Avoid high heat; it may warp thin board.

Inspect every joint, corner, and contact point after drying. Look for swelling, peeling, soft spots, and dark stains. The Cobb test, described in TAPPI T 441, measures water absorbed by paper over 60 seconds. A simple workplace check cannot replace laboratory testing, but it can reveal uneven coating. Place a few drops on hidden areas. Record the spread after one minute. I would not trust one perfect-looking corner.

Control the storage environment. ISO 187 conditions paper testing at 23°C and 50% relative humidity, with defined tolerances. These conditions provide a useful inspection reference, not a guarantee for every warehouse. Check the base weekly during wet seasons. Wipe condensation immediately. Keep the rack at least several centimeters above concrete floors. Replace damaged liner material promptly. A 2023 industry review by Smithers links moisture control with improved packaging performance, but real results depend on substrate, coating thickness, and handling. Maintenance is often the weak point. Schedule it anyway.

5 Best Ways to Waterproof a Paper Rack Base? - Dry, Inspect, and Maintain the Waterproofed Paper Rack Base

Method Recommended Materials Application Procedure Typical Drying or Curing Time Inspection Points Maintenance Schedule Best Use
Waterproof Tray Insert A rigid plastic tray or removable polyethylene liner, plus a thin layer of closed-cell foam for a snug fit. Measure the rack base, cut or select a liner with raised edges, place it inside the base, and seal any fixed joints with a compatible waterproof sealant. Usually ready immediately if no sealant is used. Allow approximately 24 hours for sealant to cure before exposure to water. Check for cracks, warped edges, gaps at corners, and standing water beneath the liner. Wipe dry weekly or after spills; remove and inspect the liner every 1–3 months. Frequent spills, damp storage areas, and racks that need easy cleaning.
Two-Part Epoxy Coating Two-part water-resistant epoxy, disposable mixing container, brush or foam roller, sandpaper, and protective gloves. Dry the base completely, remove loose fibers, lightly sand the surface, mix the two components as directed, and apply two thin coats to the top, edges, and underside. Many formulations become touch-dry within 6–12 hours and require about 3–7 days for full chemical cure. Follow the product instructions. Look for pinholes, bubbles, soft areas, exposed fibers, and incomplete coverage along corners and screw holes. Inspect monthly during the first six months, then every 3–6 months; repair chips as soon as they appear. Heavy-duty protection where the base may contact water repeatedly.
Water-Based Polyurethane Sealer Water-based polyurethane, fine sandpaper, clean brush or roller, and lint-free cloths. Sand and clean the dry base, apply three or more thin coats, lightly sand between coats when required, and cover all exposed edges. Commonly dries in 1–2 hours between coats; allow at least 24 hours before light use and several days before repeated wet exposure. Check for rough grain, missed edges, peeling, whitening, and water spots after the first few uses. Clean with a damp cloth, avoid prolonged standing water, and recoat when the surface becomes dull or water no longer beads. Indoor racks needing a low-odor, clear protective finish.
Waterproof Membrane Sheet Self-adhesive waterproof membrane, utility knife, straightedge, measuring tape, and seam-sealing tape. Clean and dry the base, cut the sheet with 25–50 mm overlap at edges, press from the center outward, and seal seams and corners carefully. The adhesive usually bonds immediately; allow approximately 24 hours for maximum adhesion before heavy loading or wet cleaning. Check for lifted corners, wrinkles, punctures, open seams, and trapped moisture under the membrane. Inspect every 1–3 months and replace the sheet if punctures or persistent edge lifting are found. Fast installation when painting or coating the rack base is impractical.
Raised Base with Sealed Feet Moisture-resistant risers, plastic or rubber feet, waterproof sealant, screws, and corrosion-resistant washers. Lift the paper rack base at least 10–20 mm above the floor, seal fastener holes, keep the base level, and provide a small drainage gap around the edges. Allow approximately 24 hours for sealant to cure; the rack can then be tested with a small amount of water. Confirm that all feet remain stable, sealed holes are intact, water can drain freely, and no moisture is trapped underneath. Check monthly in damp locations and tighten or reseal fittings whenever movement or cracking is visible. Protection against floor dampness, minor flooding, and condensation.

Practical note: Before waterproofing, the paper rack base should be completely dry, structurally sound, and free from dust, grease, mold, and loose paper fibers. Drying and curing times vary with temperature, humidity, ventilation, coating thickness, and the specific material instructions.

FAQS

Which materials resist moisture for a paper rack base?

High-density polyethylene and polypropylene sheets resist splashes, cleaning water, and daily scuffing. They also resist edge swelling. A rigid base matters.

Is sealed plywood suitable for a heavier rack?

Yes. Use exterior-grade plywood and seal every cut edge and screw hole. A tiny exposed edge can absorb water quickly. I once missed the underside and caused uneven swelling.

How thick should the base be?

Choose enough thickness to prevent bending under stacked paper. A flexible sheet may collect water in the center. Keep the base stable.

How should I clean the base before sealing it?

Remove dust with a soft brush or low-suction vacuum. Use a barely damp cloth and mild soap for stubborn marks. Dry it gently.

What damage should I inspect before waterproofing?

Check for swelling, peeling layers, crushed corners, and dark moisture stains. Trim small raised fibers carefully. Large damage needs repair first.

How can I apply a waterproof coating effectively?

Apply two thin layers instead of one heavy layer. Brush carefully around corners, seams, and bottom edges. Allow complete curing.

Can protective film help protect the base?

Yes. Wrap the film slightly over the edges and press outward from the center. Seal exposed seams with compatible waterproof tape. Remove trapped air pockets.

Why should the base be raised above the floor?

Rubber feet can lift the base several millimeters. This allows airflow underneath and reduces contact with small spills. A shallow tray adds protection.

How can I test the waterproofing method?

Test a hidden area with a damp cloth and standing water. Place a loaded rack nearby, then inspect it after 24 hours. Look for curling, stickiness, cracks, or soft spots.

Will waterproofing make a paper rack permanently waterproof?

No. Coatings and films improve resistance, but they can peel, crack, or hide damage. Inspect the underside every few weeks. Water still finds weaknesses.

Conclusion

Waterproofing a paper rack base helps protect it from moisture, swelling, stains, and structural damage. The process begins by choosing a water-resistant base material that can withstand the environment where the rack will be used. Before applying any protection, clean the base thoroughly, remove dust and grease, and allow it to dry completely. If you are wondering How to waterproof the base of a paper rack, the key is to combine proper preparation with complete surface coverage.

Apply a suitable waterproof coating or protective film evenly, making sure no areas are left exposed. Pay special attention to corners, seams, screw holes, and joints, as these are common entry points for water. Reinforce vulnerable edges with an additional sealant or protective layer, then let the base dry according to the coating’s instructions. Finally, inspect the surface for bubbles, cracks, or gaps and repair them promptly. Regular cleaning and periodic inspections will help maintain the waterproof barrier and extend the paper rack base’s service life.

Isabella

Isabella

Isabella is a dedicated marketing professional with a sharp focus on driving brand growth and engagement through strategic content creation. With an extensive background in digital marketing, she combines her passion for storytelling with her keen understanding of industry trends to deliver......